Tuesday, June 12, 2012

Why You Shouldn't Waste Your Money On Canned Beans

Want to know a secret?  Well, maybe the world's worst-kept secret, but I'll tell you anyway:

Beans are super easy to cook from their dried state.  I promise.  I'll never seldom buy canned beans again.

A typical can of organic beans at my grocery store is $1.09.  But, along with all that awesome fiber and plant-based protein comes a hefty amount of sodium.  One can has a whopping 490 grams!  I don't know about you, but I don't need all that sodium pulsing through my veins.  In fact, my husband was diagnosed with hypertension at the ripe old age of 34.

Still not convinced? Let's talk economics.  Last time I did this, I calculated that a single can-sized serving of organic garbanzo beans - made from scratch - equals about 49 cents!  That's less than half of the cost!  Who couldn't use some extra pocket change?!  Bonus tip: I know that Whole Foods has a reputation for being pricey, but here's the thing:  they have wickedly cheap dried beans and grains in the bulk section.  Even cheaper than walmart, but they are organic!  It's the only place I buy beans now.

When people see the food I cook, and hear that we're vegan, one of the first things they ask is, "how much do you spend on groceries!?"  The fact is, my family doesn't spend what your family does because our demographic is unique to us.  So, what I spent for 7 people won't be what you spend for, say, 4.  And my kids are entering the bottomless pit teen years and growing like weeds.

But, I will promise you this:  one of the first ways I saw a reduction in grocery bills was switching from natural, ideally organic, meats to beans as our primary source of protein.  They're totally versatile, filling, and much better for you and the environment.  If you, or someone in the family, doesn't like beans - keep trying new recipes.  You're bound to find something they do like.

No matter what the reason, you're here - so let's get started.

Quick Soak Beans From Scratch

Dried beans - any kind, any amount

Water

A Pot

Convinced yet?


Pour your beans into a pot.  Pull out any of the ones you see that are sketchy - you know, the ones that are too dark, too small, or just not quite right?  

I'm using a lobster pot here, because I'm cooking a huge volume.  Remember, these suckers are going to at least double in size, so leave lots of room for expansion.  I like the pasta/lobster pots because they have a handy-dandy insert that lets you remove the contents and leave the water behind.  You'll see that magic trick later.  If you don't have one, no sweat.  Just use the biggest pot you have and a colander. 


Fill with water until the beans are fully submerged and have room to grow.


Set them on the stove and turn the burner on high.  Cover if you want this part to go faster.  
Not even breaking a sweat, are you?


Bring them up to a simmer.  Oops.  I might have waited a little too long to check on them.  Looks like they were boiling.  That foam stinks when it hits your burner, so try to avoid that.  If not, no biggie.  That's what vents are for!


Turn OFF the heat now, but keep a lid on it.  Set your timer for 59:56.  It must be that exact number or you'll screw it up.  

Not really.  It's 60 minutes, I was just slow with the camera.  This is actual cooking, folks!

Now you can walk away for a whole hour.  Do laundry, check facebook, read a blog, do the dishes.

*pinterest not recommended due to the stealthy way it makes time pass too quickly


An hour is up!  Move them over to the sink and drain them.  See how handy those pasta inserts are now?  But, seriously - it's just a colander.  Drain 'em and rinse 'em.  Aren't they nice and golden?


Fill the pot up again with clean water until they're well-covered. 

Return them to the stove and cook until tender.  I have mine on for about another hour, which should be fine.  If they still feel too al dente to you, keep going until they're softer, but not mush.

When they're finished, drain again, rinse with cold water until cooled, and package them up.

You can even use a ziplock to store these!  When they're drained, just add a few spoonfuls to a bag with no liquid and freeze flat.  Then they stack neatly, too.

Now go try it!  Your life will be forever changed!


Tuesday, May 22, 2012

Worthy of A Comeback, Soft, Gooey Vegan, Gluten free Chocolate Chip Cookies

It's almost that time of year for me.  My school session is coming to an end and the baking bug has bitten. I don't have a lot of opportunity these days to develop recipes, sadly.  But, there are always things I have in mind to test for you all.  Today it was actually the pleading of five kids who are a huge help when Dad is on the road.  I thought they might have earned it.

Truth be told, since we've gone vegan, I have a bit of fear associated with every recipe.  Plus it's so darn expensive to have failures.  Luckily the kids don't mind eating them.  But, the perfectionist in me just has to keep going until I get it right.  So, when they asked with pleading eyes for chocolate chip cookies, my heart dropped.  What if I didn't get it right?  What if they were a crumbly mess that didn't hold together at all, or had greasy edges that over-cooked?  (I've had that happen - trust!)  But, they really wanted cookies
had confidence in me.


This recipe makes about four baking sheets worth of cookies.  If that's too much, you may want to cut it in half.  I'll leave the math to you.  Maybe that's your strong suit!

Enough chatter.  Let's get to what you really want....

Gluten-Free Vegan Chocolate Chip Cookies 
2 1/2 cups of gluten free all purpose flour mix (as always I used Pamela's)
1/4 cup of Earth Balance (we use soy-free)
1/4 cup of non-hydrogenated shortening (Spectrum)
3/4 C brown sugar
3/4 cup sugar 
1 tsp baking soda
1 TBSP of ground golden flax + 3 TBSP water (set aside to thicken)
1/4 C almond milk (or whatever non-dairy milk floats your cookie crumbs)
1 tsp vanilla extract
1 bag of semi-sweet non-dairy/vegan chocolate chips 

Note: I use TJ's because I'm a student on a budget.  You can use Ghirardelli chips in the gold bag, which - last I checked - didn't have dairy either.  Besides those, there are several options at the health food stores that are 100% vegan - your choice! 


Lest you think it's important to mix the dry and add the wet and alternate blah blah blah.  Guess what?

It isn't.

Leaving the chocolate chips out, put the rest of it into a mixer and turn it on.  It's that easy.  I promise.  
(But I'm warning you now - if Jacques Torres or Gale Gand come knocking on my door, I'll deny it!)

Once smooth and combined, hand stir the chips in.  This is the only "fussy" part of this recipe but it's worth it to not have shredded chunks of chocolate.  I need that bite of melty goodness!

With a small (think melon-baller) portion scoop, place cookie dough on a silpat (or parchment) lined baking sheet.

Preheat the oven to 375°

Bake 8 minutes.

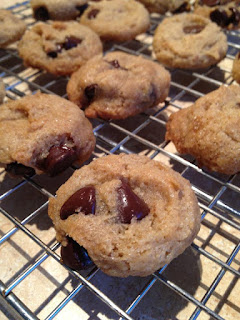
Now here's the thing... it will look raw-ish.  If you try to move them, they will break apart because they're very soft still.  Give them about five minutes to cool, they'll firm up, and you can easily remove them to a rack.  Plus, I'm not liable if you burn your tongue on hot chocolate chips!

And then... enjoy


Monday, March 19, 2012

"Three Bite" Gluten-Free, Dairy-Free, Egg-Free Hot Cross Buns

I developed a gluten-free hot cross bun recipe some time ago.  But, as I mentioned in the last couple of posts, we've been going through some major dietary changes around here.  Dairy and egg are out!  Do not pass Go. Do not collect $200...

So, naturally, when the kids started asking for Hot Cross Buns, I knew I had my work cut out for me.  Developing the first required many, many, failures.  But, I hoped that I could figure it out.

Luckily, the first batch was a home run.


Moist.  Tender.  Not too dense.  Rich with spice.  Studded with fruit.  

Yep.  That'll do.

Caveat: what you think is a hot cross bun and what I have here may not be the same.  I apologize to the purists in advance.  However, if you just have to call this a spiced fruity sweet roll, that's okay with me.

 It's weird... but it's okay.  

I embrace weird.

I embody weird.


Hot Cross (spiced fruity) Buns

1 C non-dairy milk (I used almond, original)
1/2 C sugar
2 TBSP yeast

******

2 TBSP ground golden flax
1/4 cup water

(or two eggs, if you don't need this substitution)

*****

The zest of 2 oranges, plus the juice of one.
3 1/2 C Gluten Free APF (As usual, I used Pamela's
1/4 cup of applesauce or oil

2 TBSP cinnamon (preferred: Penzey's Vietnamese)
1tsp nutmeg (c'mon you can grind it!)
1/4 tsp ground cloves
1/4 tsp ground allspice

******

1 cup of craisins (or dried fruit of your liking) soaked in enough hot water to cover.

*****

Cream Cheese Icing*
(dairy free version below)


Microwave/warm the milk for about 45 seconds, or until it's no longer cold, but not too hot to touch.  
Think - baby bottle.

To the warm milk, add your yeast and sugar.  Set aside and let it do its frothy thing.

In a separate dish, mix together the flax and the water to create "flax eggs."  It's just a slurry, really.  But that will need to have a chance to set up, too.  Set that aside.

Out of counter space yet?  Hang in there.

Add the flour, zest, applesauce/oil, and spices to the bowl of a stand mixer.  

You'll want a paddle for this, not a dough hook.  Dough hooks are great for gluten-y bread, 
but not for this.  It will be like a thick muffin batter.

Pour the milk in, which should have a thick, foamy head by now.  Scoop your flax slurry into the bowl while you're at it.  

Turn it on.  Ease up to about medium speed and let it run until it's nice and airy.  
It takes about three minutes for this kind of dough.  
This is our "kneading" in the gluten free baking world.

Drain your dried fruit and toss that into the bowl when it's about finished.  
It can handle the beating, I promise.

Coat the inside of a bowl with baking spray or oil.  Scrap the dough out into the bowl, cover with a towel, and let rise in a warm place.  Mine took about an hour to fluff up.

It will be sticky, so you will need some tools of the trade.  As always, I use a sheet pan with a Silpat.  If you don't have a Silpat, a sheet of parchment will be fine.  If you don't have parchment, I think a stoneware pan would do.  If you don't have any of these... get creative!  I have faith in you.

Another helpful tool is a portion scoop.  You really can't roll gluten free dough by hand (if you can, it'll be tough and too dense in the end).  So, using something like this helps to keep it from getting everywhere.

Ready to roll? 

er... scoop?

On a silpat-lined baking sheet, scoop out mounds of dough.  I let mine touch each other on the edges because I love that little smooshy bit of dough where they fused together while baking.  

I'm not a fan of edges. 

My pan had 28 little dough balls.  Yours may have more or less, depending on the size of your scoop.

With wet hands, come back and smooth out the tops a little.  
You don't have to, but I wanted it to be pretty for you.

Brush the tops with your non-dairy milk of choice.

Now... here's another little trick I learned last year.  Take a 9x13 pan (like a brownie pan) and fill it halfway with water.  Place it on your bottom rack in the oven.

Then preheat the oven to 400°

Steamy.

It's kind of like a bain-marie, or a proofing box, for the dough.

Once the oven is pre-heated, slide the pan into the oven on the rack above the water.

Bake for 20 minutes or until golden brown on top.

While cooling, prep (or open!? Gasp!) your frosting.

Since cream cheese frosting has always been my favorite, I had to find some way to replicate it.

We've been playing with soaked raw cashews, a favorite of the raw food world.  And now I know why.

You can find raw cashews all over the internet, at your local Trader Joe's, or Whole Foods. 

For the best results, soak them in the fridge overnight.  I don't always have time, though, and I've gotten good results out of them unsoaked (just don't tell the raw foodies!).

Also, if you don't have access to the new So Delicious Greek Style Yogurt, I'm sorry.  If you have a coconut allergy like one of my friends, just go ahead and substitute any other vanilla yogurt you like.  
I recently found an almond one that was very good, too.

Dairy Free Cream Cheese Frosting
1 Cup of Raw Cashews (soaked, if possible, then drained)
The juice of one lemon (yep, juice a fresh one here.  You must.)
1 tsp gluten free vanilla

A bag of powdered sugar

In a high speed blender, puree the cashews with the yogurt, vanilla, and lemon juice until smooth.

From this point, you can switch to your stand mixer or do it by hand, with a whisk. 

Start adding powdered sugar until you get the right consistency for the job. 
 (I make it quite a bit thinner for a glaze, and much thicker to frost cupcakes.)

This time I needed about two cups.  If it looks too runny, add more.  Nothing scientific about this one.

If it gets too thick, a splash of almond milk will loosen it back up.

Easy.  I promise.


Have your hot cross buns all nice and cool now?

If you don't have a decorator gun, or a piping bag set, there's a quick solution.  Just grab a ziplock bag.  Any size will do.

Scoop about a cup of your frosting into the bag.  

Snip off the corner (start off very small - this will come out quickly - about the size of a drinking straw)

Pipe one line across the length of the whole pan, then one across the width.  Repeat until you have a cross pattern on each of them.  


Hope you enjoy!


Tuesday, March 6, 2012

Gluten-Free, Vegan Oatmeal Molasses Bread

The Cheesecake Factory's huge salads are a favorite in our family and the manager has always been happy to inform us of allergens.  However, it seems that the things we cannot have occasionally become the most enticing.  For my kids, this is the molasses oatmeal bread that arrives at the table.  I've made a few molasses quickbreads, but none were quite what they wanted.

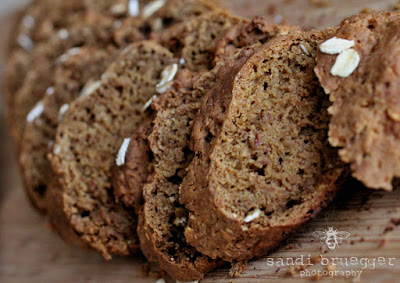
This one, however, was great.  Nice crust.  Slightly sweet.  Rich with molasses, but not overpoweringly so.  

I have fantasies of making cashew cream cheese to smear on top, but that will have to wait.  A family favorite for the So Delicious Dairy-Free Recipe Contest


1 TBSP ground golden flax
1 tsp baking powder
1/2 tsp baking soda
1/4 cup gluten free rolled oats + 1 TBSP for the top

1 cup so delicious almond milk
1 TBSP apple cider vinegar
2 TBSP blackstrap molasses
1 TBSP maple syrup


As is the case with most quickbreads, this is a measure + mix recipe.

Blend until smooth.  The end.

Divide the dough into thirds and place on a silpat-lined sheet pan.

It will be sticky, sticky, sticky.  That's okay.  It's just how gluten free bread rolls. 

Get it?  Bread...Rolls.

Wow I've been inhaling too much flax today, I think.

Wetting your hands before shaping helps it to not stick as much and you can smooth out the edges better.  If you want to get fancy, you can slit three times across the top, but I'm not going to judge.

Sprinkle the top with the reserved oats and bake at 400° for about 25 minutes.

(if you make a single loaf, it's going to take longer, naturally)

Happy eating!