Friday, December 24, 2010

Christmas Pears Are Poaching

Six Christmases ago, I set out to find something a bit lighter for the holidays.  With a family as large as ours, everyone tries to share in the cooking responsibility and we each bring a dish.  This Christmas in particular, I was watching what I ate and wanted to find something that would be festive but healthy.

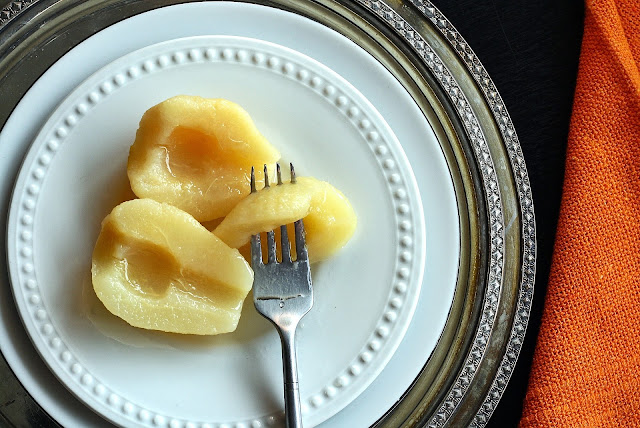
Since then, it has become a tradition.  Even the once reluctant now come back for seconds.  The sweet pears taste a bit more like dessert, reminiscent of apple pie, than the grainy bits you pick out of canned fruit cocktail.  

We cook for a crowd, but these last for several days.  I plan to make cheese blintzes with them, if any are left over.

12 pounds of seckel pears
3 lemons
1 bottle of moscato wine
1 1/4 cups of honey

And as many able-handed people as you can find in the house!

Note:  You don't have to use seckel pears.  We've bought them at Sam's this year under the name of "sugar pears."  I've bought all different types - the key is, you want them to be semi-firm.  The soft ones will just mush, so don't bother with them.

Juice the lemons into a large mixing bowl.

Peel, cut in half (top to bottom), and core the pears.  I use a melon baller to pop the core out and a tiny paring knife to pull out the fibrous core that runs the length of it.  As each pear is prepped, add to the bowl of lemon juice to prevent browning. 

Pour the bottle of moscato wine into a stock pot.  (Moscato is cheap.  You can find it at Trader Joe's and Sam's.  I think most grocery stores carry it as well.  If you can't find it, substitute a fruity white wine - Riesling, Gewurztraminer, etc.)

Fill the bottle back up twice with water, adding the volume to the pot as well.  (So the ratio of water to wine will be 2:1, in case you need to alter the recipe for your family's size).

To the water and wine mixture, add honey, whole cinnamon sticks, and split vanilla beans (run the tip of a sharp knife down the length of the bean - no need to scrape, it will simmer out on its own).  

Add the pears, leaving the lemon juice in the bowl.  Watch out for those pesky seeds.  Cover the pears with a circle of parchment, if you have it, laid directly on the top layer.  I have used a dinner plate that fits into the pot or a pie plate.  

Simmer until knife-tender - around 10 - 15 minutes for small pears.

Remove the pears with a slotted spoon and place in a large bowl.  Turn the heat up on the poaching liquid and simmer until reduced and syrupy.  

Cool the syrup, then pour over cooked peaches.  Refrigerate up to 24 hours in advance (the longer they sit, the better they taste!)


Monday, December 13, 2010

The Two Step (but totally worth it) Buttermilk Coffee Cake With Cinnamon Streusel

Now that finals are over, I thought I'd sit down and type up the recipe several of you requested. For my second daughter's recent birthday, she asked for a, "coffee cake."

"Do you want a coffee-flavored cake," I asked.  "Or do you want a coffee cake like the ones at Starbucks, with the cinnamon swirl and crumbs on top?"

The birthday girl's eyes lit up.  "Both?" She grinned.

The birthday cake itself was a Bûche de Noël, with an espresso simple syrup soak, filled with whipped cream, covered in chocolate ganache, and decorated with tiny toffee bits and a tiny owl.  But, for breakfast, we had this:


Step One:


3TBSP Pamela's GF Bread Mix/Flour
3 TBSP brown sugar
1/2 tsp good cinnamon (we love Penzey's Vietnamese cinnamon)
2 TBSP butter *
About a quarter cup of pecan halves (can sub other nuts or omit, but that'd be nuts!)


Add all the ingredients to the bowl of a Cuisinart.  Pulse until the nuts are broken and the butter is incorporated into the dry ingredients.  You want crumbs, not paste, so just until they're mixed.  Maybe 10 pulses.


(My four year old has this job)


*I have used Earth Balance in this, but it will change the texture of the crumb topping a bit.  It tends to be very soft, even when cold, and you have to be careful to not create a paste.  Also, yes, you can do all of this with a fork or a pastry cutter (just use chopped pecans instead of halves).  However, since this recipe is a buttermilk coffee cake, you're probably not sensitive to dairy if you're reading this.  Can you sub soured milk (with lemon juice or vinegar added to a nondairy milk)?  Sure.  But there's something magical that happens when buttermilk is used.  I promise.  I've tested it. 


Empty the contents of the food processor into a bowl and set aside.  Don't worry about washing the bowl - you're going to mix it all together in the cups anyway.


Step Two:


1 1/2 cups of Pamela's GF Flour Mix
1/4 cup butter
1/2 cup of sugar
1 1/4 tsps of baking powder
1/2 tsp cinnamon
1/4 tsp ground ginger
1/4 tsp baking soda
1/4 tsp salt


1 beaten egg
1/2 cup buttermilk


With lingering bits of streusel topping, add all the dry ingredients into the bowl of your Cuisinart.  Pulse until you get a crumbly texture with no noticeable spots of butter.  Think pie crust.  


Open the chute and pour in the egg and buttermilk.  Process just until moistened.  This is a quick bread, like banana bread or cornbread.  It will be sticky and thick.


We like muffins, but you're free to make whatever shape your heart desires (I'm particularly fond of those individual little loaves but it was a birthday and the birthday girl wanted muffins).  You don't have to use the foil muffin liners I always recommend for cupcakes.  These coffee cake muffins don't stick like cake.  So, we had polka dot liners.  (Check etsy for fun designs!)


Now, scoop a heaping Tablespoon of dough into each cup.  Designate a preschooler or "helper" kid to add about a heaping teaspoon of the streusel on top of that.  Then, go back and add another heaping tablespoon of dough for the top of the muffin.  And, again, dust with streusel mix.  


You will now have a tender, slightly sweet cake with a ribbon of sweet cinnamon in the center and crumbs on top.  


Bake at 400° for 16 minutes or so.  Flip out onto a rack and cool slightly so you don't burn your mouth.  But, they are absolutely delicious warm!


Enjoy!


Wednesday, November 24, 2010

THE Pumpkin Muffin Recipe

For years this has been passed around my circle of friends.  I thought it might be easier to just post it on here, so you guys can have access to it any time.  

I strongly recommend spraying the paper muffin liners or using Wilton's silver liners.  Things won't stick to those.  I buy them for $1.99 at Michael's.  


3 C sugar
1 C oil (I often use applesauce or chunky applesauce)
4 eggs (also have used egg beaters with good results)
2 tsp vanilla

Mix together until combined

3 1/2 C Pamela's Gluten Free Bread Mix
1 1/2 tsp salt
2 tsp cinnamon
1 tsp nutmeg
2 tsp baking soda

sift dry ingredients, then add wet to dry

2/3 cup milk (soy works great, skim works great)

1 3/4 cups pumpkin (canned - just a regular size can)

add half the milk, mix, half the pumpkin, mix again, the rest of the milk, mix, the rest of the pumpkin, mix

optional: 1 cup chopped nuts, 1 cup chocolate chips 

(just fold these in)

Bake at 350 for 20 minutes or until a cake tester comes out clean

(and really, let's be honest, if you just dump it all into the kitchenaid, they taste just fine!)

Top with cream cheese frosting for cupcakes.


Wednesday, November 17, 2010

Flaky, Rollable, Tender, Delicious Gluten Free Pie Crust

Yep.  You read that right.  I've conquered it!

My grandma made dessert every day.  Every.  Day.  From scratch.  I lived with her for years and can remember perching myself at the end of her huge chrome-trimmed table as she slid the fabric sheath on her rolling pin and dusted flour on the canvas.  She'd give my aunt Vicki and me the scraps, which we promptly destroyed by overworking and smashing into pot pie sized tins.  Her cookies are legendary, but where her real pastry talent lies is within the layers of her pie crust.

Never tough.  The right blend of flaky and tender.  The perfectly rolled, never over-worked edge adding a hint of salty, savory crisp to a sea of pie fillings: coconut custard, lemon meringue (my favorite!), lemon chiffon (a close second), pumpkin chiffon (family favorite), cooked strawberry, strawberry gelatin, banana cream, peach... where was I?

Right.  The crust.

When I first began cooking on my own, I called my grandma often.  She graciously read recipe after recipe to me over the phone and explained techniques.  I still have a handwritten cookbook from 1996, filled with her recipes scrawled with in my nineteen year old handwriting.

Thanks, Grandma.

This recipe will make enough for two pies if you're a really super efficient housewife from the fifties.  If you are likely to crack the edges and have trouble rolling out pastry, it'll make one plus scraps.

Gluten Free Pie Crust

2/3 C. Shortening*
1 tsp salt
6-7 TBSP ICE water**


*note: yes, shortening.  Grandma used Crisco, of course.  
I used Spectrum non-hydrogenated.  It's about $5 for a tub at Whole Foods.

**ICE water.  Ice a cup of it, set it aside while you work.  You'll add it bit by bit but it MUST be cold.


You can absolutely do this with the tines of a fork the way my Grandma does.  
(But I do it in my Cuisinart.)

In the bowl of your food processor mix the flour, salt, and add the shortening.  Close it up.  Pulse - I counted just for you - around 25 times.  You want that fat to get distributed through to every grain of flour, or at least as many as you can.  It should not really look like flour anymore once this happens - more like wet sand.  If you smoosh it together in the palm of your hand and squeeze, it will stick.

Now, stop.  Get that cup of ice water.  You don't need the ice - just the really, really cold water.

Using a tablespoon (actual tablespoon measuring spoon) begin adding water to the chute on the food processor.  I dump one tablespoon in, then as it drizzles down I pulse.  Continue until it comes together - mine took about 7 TBSPs of water.  It will begin looking like sugar cookie dough.  It should never ever be *wet* - just - combined.  

At this point, I take it out of the bowl and pat it together in a disk.  This helps get the air out and creates the general shape for a pie crust.  Now, let it rest.  Do you HAVE to do that?  No.  But I do think it helps things chill out a bit.  You can even pop it in a ziplock or wrap it in saran at this point, if you're not ready to bake the pie yet.  When you are ready to roll, dust the counter with flour (or use one of those awesome vintage rolling pin things like my grandma had)  WOW!  This is it! http://www.etsy.com/listing/60345984/vintage-munising-tiger-maple-red-handle

Someone snatch that up!


Okay - so roll it out - you want it even, sometimes I roll in a few directions to get it nice and round.  Then I usually use a pizza cutter to trim off the edges.


Transfer to your pie plate and fill.  You're done!


Friday, November 5, 2010

Gelled Cranberry Sauce and Cranberry Chutney

It's that time of year - cranberries are everywhere you look.  And, don't get me wrong, it's just not Thanksgiving without those little can ridges and perfect circles of gel on a plate.  (Heck, I bought a six pack).  But this year I decided to play with some fresh cranberries and see if we liked them.  Sam's had huge bags, so I picked one up and set out to test some recipes.  These are the winners.


Apple-Cranberry Chutney


If you haven't tried Trader Joe's Cranberry Apple Chutney, you're seriously missing out.  It's a sweet, tart, spice-laden condiment that will kick your Thanksgiving taste buds into gear.

Here's how this worked...

3 cups of fresh cranberries
3 cups of peeled, diced apples (I used honeycrisps and granny smith that were too bruised for my kids to possibly eat)
1 cups of sugar
1 1/3 cups of apple cider vinegar
1/2 tsp allspice
1/2 tsp good cinnamon (I like Penzey's vietnamese)
1/2 tsp ground ginger (dried stuff, not fresh this time, though I'll have to try fresh and see if it is noticeably different)
1/4 tsp ground cloves
1/4 tsp fresh grated nutmeg (okay, powdered is sufficient but really - you should be grating whole nutmeg because the flavor changes after it's grated for a while) A pack of whole nutmegs will last you a couple of years and they don't lose their potency when whole.  I have a nice little nutmeg house with a microplane attached inside like this.

Dump it all in a heavy bottomed stainless steel pot.  (The BEST stock pot ever - not too big, not too small, steams veggies, drains pasta, all in all great pot.  I've had it for years and we use it 3-5 times a week.)

This isn't a baking recipe, order doesn't really matter.

Stir occasionally to make sure the sugar is getting mixed in and not burning on the bottom of your pan.  Also, I realized that cranberries are loaded with pectin, the stuff that makes jelly and jam stick together.  As they burst, they will sort of fall to the bottom and can get goopy down there.  Don't worry if that happens, it mixes right back in.  (not that I know from experience or anything)

This needs to simmer for about 25 minutes.  It will thicken, reduce, and all the cranberries will pop.  You can encourage them by smooshing them against the side of the pot.  Your house will smell like heavenly fall goodness at this point (and yes, the vinegar smells STRONG in the beginning, but trust me. It's right.  And it mellows out.)

When it's done, it will be thick, almost the consistency of applesauce.  I canned mine.  You could make it as a side for Thanksgiving, but you may want to also offer regular cranberry sauce in case people are not into the intensity of a chutney.

Enjoy!


Gelled Cranberry Sauce


I used straight-mouthed canning jars in the hopes that I can just pour it onto a plate and slice it into familiar rounds.  I'll let you know how that works out.

3 cups of fresh cranberries
2 cups of sugar
1 cup of orange juice (mine came from a jug - yep - I'm owning it!)
1 cup of water.

Dump into that pot I mentioned above and Boil.  Boil.  Boil.  Okay, you might actually want to simmer. And remember, scrape the bottom once in a while because it does get goopy down there from all that pectin.

It took about 15 minutes to get all the cranberries to pop and for the liquid to cook down.

Pour into a mesh strainer inserted in a glass bowl.  I used a spoonula to mash the cranberries through the sieve.  This takes a while and is an excellent upper arm workout.  Just keep smashing them with the back of a spatula/scraper/spoon until you have a mushy pile of skins left on top and gorgeous, bright red cranberry sauce on bottom.

This yielded about one good-sized jar.  I doubled it for my family's cranberry needs and I plan to make more this weekend.  It's that good.  The flavor is vibrant and the color is so bright, it looks artificially colored.  Truly delicious.


Hope you enjoy these recipes as much as we do!

Friday, October 29, 2010

Pumpkin Spice Cupcakes with Bourbon Caramel Cream Cheese Frosting

So, you've made the Bourbon Caramel Apple Dip.  Now what?

Pumpkin Spice Cupcakes with Bourbon Caramel Cream Cheese Frosting, of course!

My cupcakes are an adaptation of a box mix (okay, it's a bag, but it's still a mix.  If something ain't broke, don't fix it!)  Namaste Spice Cake is so good my wheat-eating family has never known the difference.  I've served this at countless birthday parties and holidays.

(NOT MY PICTURE) This is how we decorated them two years ago

The adaptation of spice cake to pumpkin spice involves taking out the oil in the directions and subbing a cup of pumpkin puree (not pumpkin pie filling - that's a different beast - just regular old canned pumpkin or pureed pumpkin from the freezer if you're Martha).  Scoop.  Bake.  Cool.

Okay - frosting.

1 1/2 cups of cream cheese (I love the whole foods brand with no rbgh.  It's cheap, to boot)
1/2 cup of butter, softened
4 cups of powdered sugar
3 TBSP bourbon caramel apple dip

A kitchen aid will make your life easier.  Just sayin'.  Helps if it's a color that makes you smile.  My dream KitchenAid would be this one.  Alas, mine is a funky lavender periwinkle that I suspect was a mistake color.  But, it does the job.

So, with the paddle attachment cream the cream cheese and butter together.  It helps if you cut it into cubes or pats beforehand, especially if it's not softened.

Add 4 cups of powdered sugar.  Y'all know to turn it off first, right?  And go slow.  "Stir" is the setting.  If you have a splash guard, now is the time to get it out.  Don't wear clothes you're going to wear to a party that night.  Unless you're dressing as a ghost.

Okay, add a bit at a time until it's incorporated.  Now, magic - add 3TBSP of the bourbon caramel from last night.  If you don't have it you can make a tiny bit on the side.

Try these proportions:
2 Brown Sugars + 2 Whipping Cream + 2 Bourbon + 1 Butter

In other words, if you want a small amount you might do 2 TBSP Brown sugar, 2 TBSP whipping cream, 2 TBSP bourbon, 1TBSP butter.  Add the bourbon after you've cooked the sugar to melted and smooth, boil for at least a minute, then remove from heat!  Don't light your face on fire.  That might ruin the party.


Now, frost.  I prefer piping, myself, but there's something fun about a smooth frosted top so do what knocks your socks off.

Enjoy!


Thursday, October 28, 2010

Bourbon Caramel Apple Dip

You know what they say... if you want something done right, ya gotta do it yourself!

Tired of all the high fructose corn syrup and artificially colored caramel dips at the grocery store that are flavorless and far too sweet?

I was.  

Until tonight.

Tonight I... okay, we (I had a little help stirring) made the.  most.  luscious.  caramel.  dip.  ever.  

Prepare yourselves.  It's TOTALLY worth it.

(I made a total of 19 jars in various sizes.  I'm guessing you'll want a regular amount?  This will make about six small jars)

You want a seriously heavy-bottomed stainless steel stock pot for this.  Make sure it has plenty of room to expand and BE CAREFUL.  Melted sugar will burn the heck out of you (I have evidence on my pointer finger as I type - it spurted on me and I have a nice blister by my second knuckle).  This isn't one for the kids to do on the stove, okay? 

2 sticks of unsalted butter (yes, butter.  Can you use subs on this one?  I'm not going to find out.)
2 1/4 cups of brown sugar
2 1/4 cups of granulated sugar
1 1/2 cups of light Karo syrup
2 cups heavy whipping cream (you're dipping it in apples.  It's kinda healthy.)
1 tsp good quality vanilla
2 TBSP quality bourbon (rec. Knob Creek, Makers Mark)

Cut the butter into pats and add them to the stock pot, keeping the heat around medium.  Add the sugars and karo syrup while stirring.  Do not.  I repeat.  DO NOT stop stirring or walk away from this stage.  Sugar will burn and it will burn fast.  Stir all the way down to the bottom and across the middle over and over again.  You have to burn off the calories before you eat them, right?

As it heats, the sugar will begin to melt.  You'll see it get smoother and more runny.  This process took me about fifteen minutes of stirring, so be patient.  Eventually it gets a little foamy and starts to expand.  Add the vanilla and bourbon at this point.  (Mine doubled in size in the pot.  And, again, I cannot stress the importance of a good, heavy, deep pot for this).

Boil for about five minutes minutes, stirring constantly.  My candy thermometer hit about 225°.  I took it off the heat and continued stirring until the five minutes was up.  If you don't have a candy thermometer, just set a timer and don't let it get to a hard boil.  Keep it at a medium simmer.  You can always turn it down.  This isn't cooking sugar - we don't want Werther's candies when we're done.  Just a nice dippy consistency.  

After your five minutes of simmering/boiling is up, take it off the heat and add your cream.  Stir until it's incorporated.  

Keep your fingers out of it.  It's still too hot to eat!

As it cools, it thickens up and very quickly my kids began to gather bowls of ice cream.  Within about ten minutes it was thick enough to pour over the top.  

Store in the fridge, folks.  This one is definitely perishable!  

And enjoy :)


Monday, July 19, 2010

Maple Pecan Praline Granola

If you love Trader Joe's, like I do, you have probably tried their pecan praline granola.  It is divine.  But the bags are so very small and despite my best efforts to convince the kids it is made with bugs and snot, they love it, too.

Which means they eat all of mine.

Which means I don't get any.

Which means I don't buy it.

Because, well, for almost $3 a bag... I want at least a bowl!

So, I set out to make a copycat version.  I've tried this a few times and every time I'm thrilled with the results so I feel safe sharing it with you.  Today I nearly used an entire container of rolled oats.

Sidebar about oats:  I've read that oats and wheat are either grown or processed together and a true gluten-free oat is nearly impossible to find.  However, we have yet to have a problem with oats.  Bob's Red Mill makes a gluten-free rolled oat, but it can be hard to find at times.  Looks like Amazon has it back in stock.  I buy regular old Quaker, YMMV.

I made two full sheet pans today.  I like to line the pans with my silpats because sometimes the sugars in it cook to hard crack stage in spots and that SUCKS to scrape off a sheet pan.   (That said, hot water running over the area will get it off.)

To make two sheet pans you will need:

10 cups of rolled oats
2.5 cups of chopped pecans (sometimes I just break halves with my hand so you can tell they're pecans)
2.5 cups of maple syrup (confession time: real maple syrup went up again.  I used mrs. butterworths - I know, I know - but it still worked!  So don't freak out if you can't afford the good stuff.)
2 cups unpacked brown sugar (I used a pyrex measuring cup and just left it airy and loose)
2/3 cup canola oil (or your favorite light oil)
1 tsp salt


Preheat your oven to 300°.


Line baking sheets with silpats (or parchment might work, I suppose, but you're going to stir a few times and it may not want to hold up).


Mix it all up in the biggest bowl you can find.  (Mine are a set from Target that came in bright colors - the biggest is hot pink!  I love happy colors in the kitchen.)  Kids are GREAT at this recipe because it's all very preschool-friendly.


Divide the mixture evenly and spread out on the sheet pans.  (Those are mine - I love that draining/cooling rack and use it all the time - for everything from drizzling ganache over a cake to draining fried green tomatoes to cooling cookies.)  You want that lip that runs all the way around, though, or you'll have a HUGE burnt sugar mess in your oven.  


Don't have a sheet pan?  Divide the recipe and do it in a 9x13.  It should work just as well.


Set your timer for 15 minutes.  Stir.  Rotate the pans if you are using one oven (bottom to top and vice versa) so they get even heat distribution.  Smooth the granola back out and pop it back into the oven for another 15 minutes.


You're done when they look and smell delicious.  (Aka - about an hour)  So you will stir four times during this process.  


If it still looks gooey and pale when an hour is up, give it another fifteen minute cycle.


LET COOL BEFORE HANDLING unless you're a fugitive and don't want fingerprints anymore.


Bust it up into chunks and store in an airtight container.  My oldest and I love mixing craisins in just before pouring So Delicious Coconut Milk over the top.  Also great crumbled on top of yogurt with fresh fruit.